Create custom widget
1. Widget introduction
Widget is an element of a graphical user interface that displays information or provides a specific way for a user to interact with an application. In the context of digital.auto playground, a widget is associated to the behavior represented by one or more Vehicle APIs.
Each widget is an isolated website, embedded into the playground dashboard by iframe. The playground supports a mechanism to set/get APIs value from/to widget.
digital.auto playground supports some universal built in widgets for quick experimentation.
In case of advanced users who want to have more customization, e.g. more colorful, neat design, etc…. This is a guideline for you to do so.
2. Create a widget with Web Studio
To create a custom widget follow bellow step.
Step 1: in a prototype, open dashboard config.
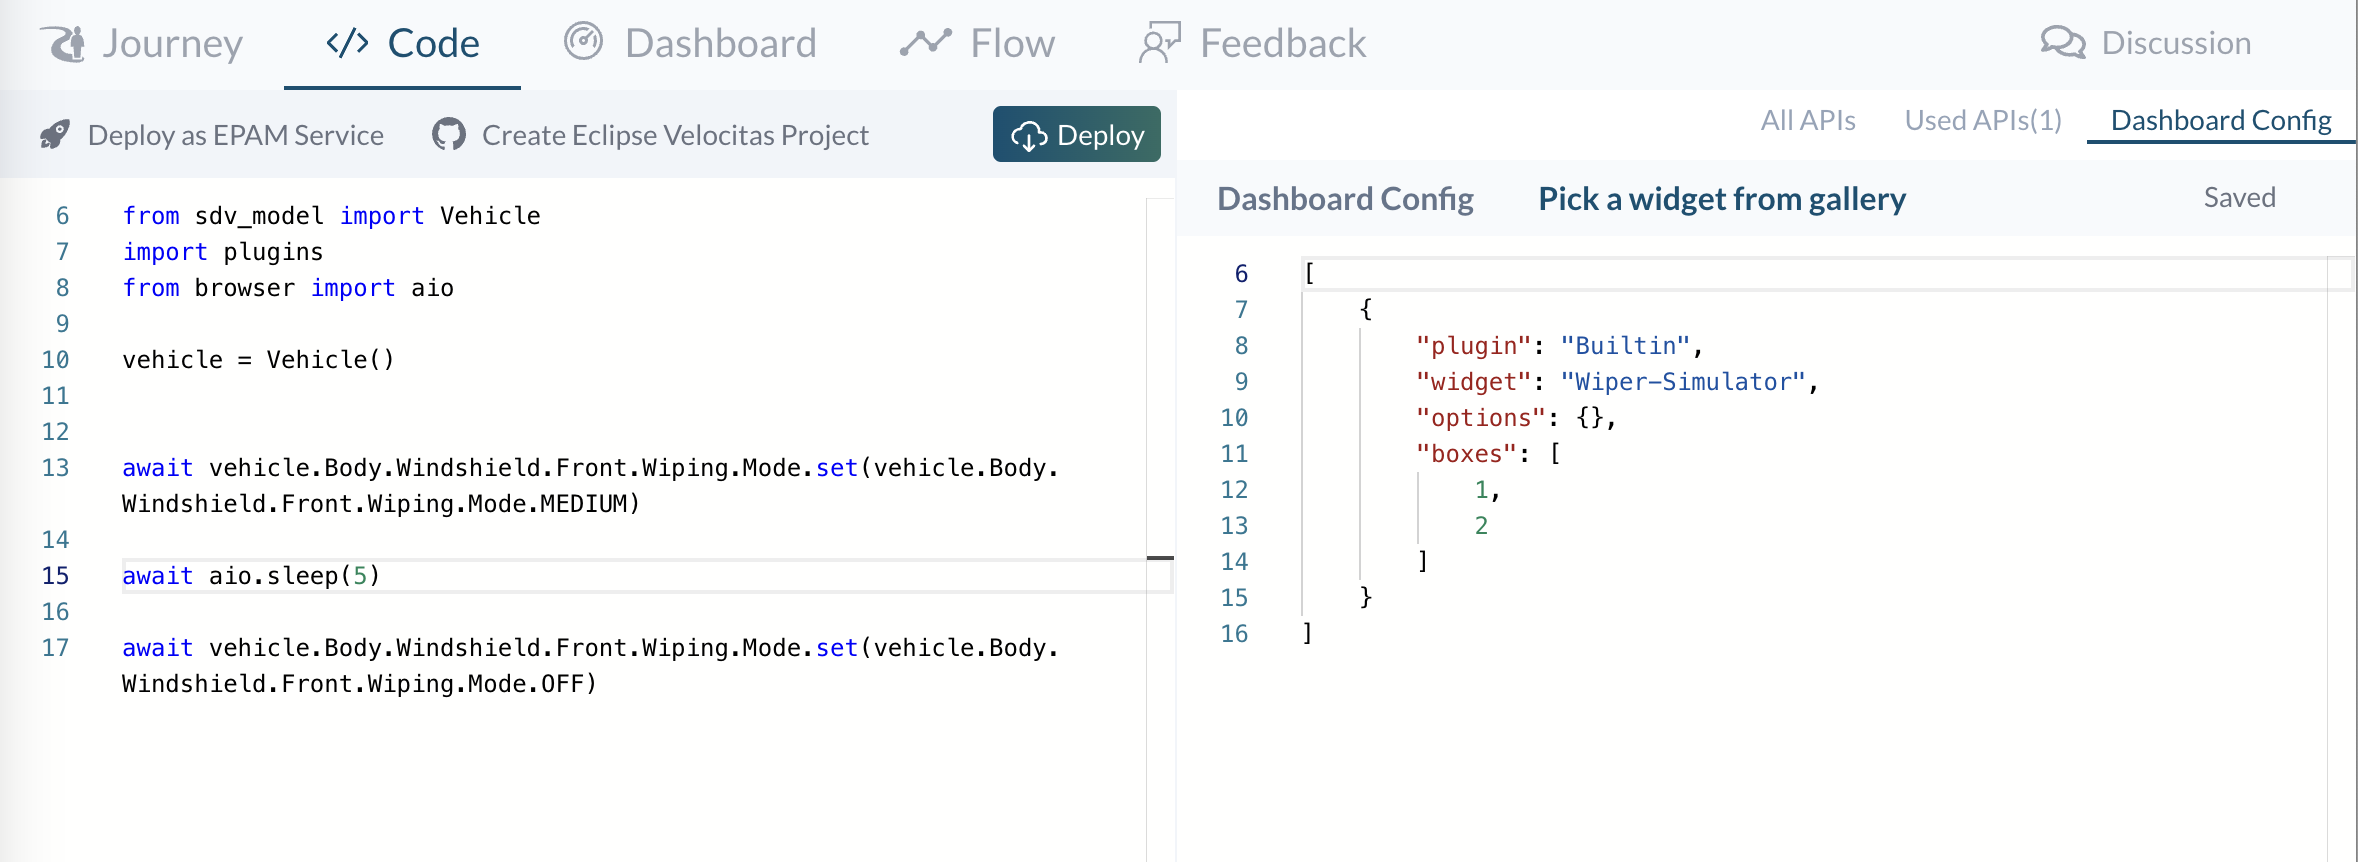
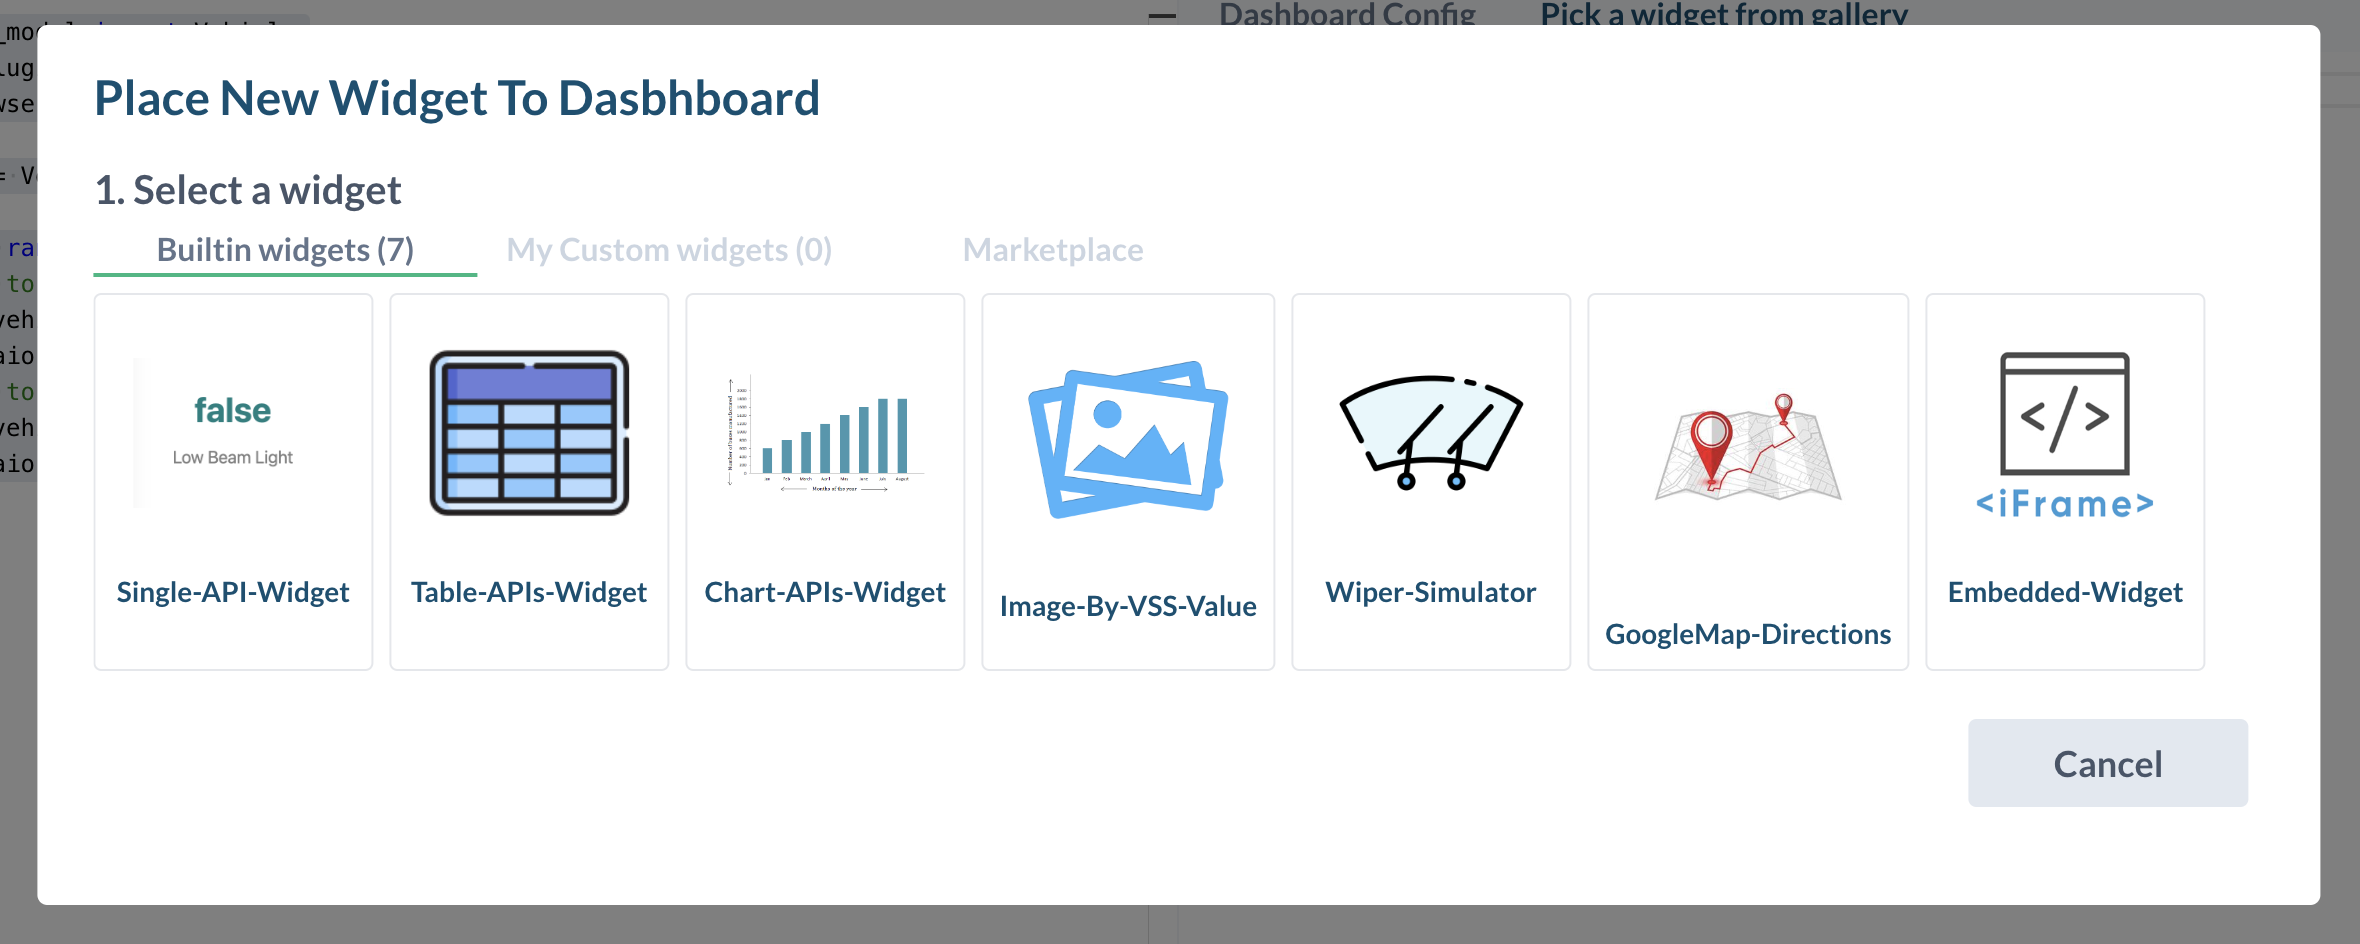
Step 2: Click “Pick a widget from gallery” button. Then select an “Embedded Widget”

After click on Create Embedded Widget with our Web Studio wait for few seconds, Web Studio opened in new tab, and you can write your widget code there.

On the Web Studio tab, you can find there are some sample code already generated.

Step 3: Remove sample code and copy and paste below code
<!doctype html>
<html>

<head>
    <meta charset="UTF-8">
    <meta name="viewport" content="width=device-width, initial-scale=1.0">
    <script defer src="https://bestudio.digitalauto.tech/project/BzR91b49OHqj/syncer.js"></script>
</head>

<body style="color: black;font-size:12px text-align:center;padding: 8px;">
    Hello! I am custom widget.
</body>

</html>
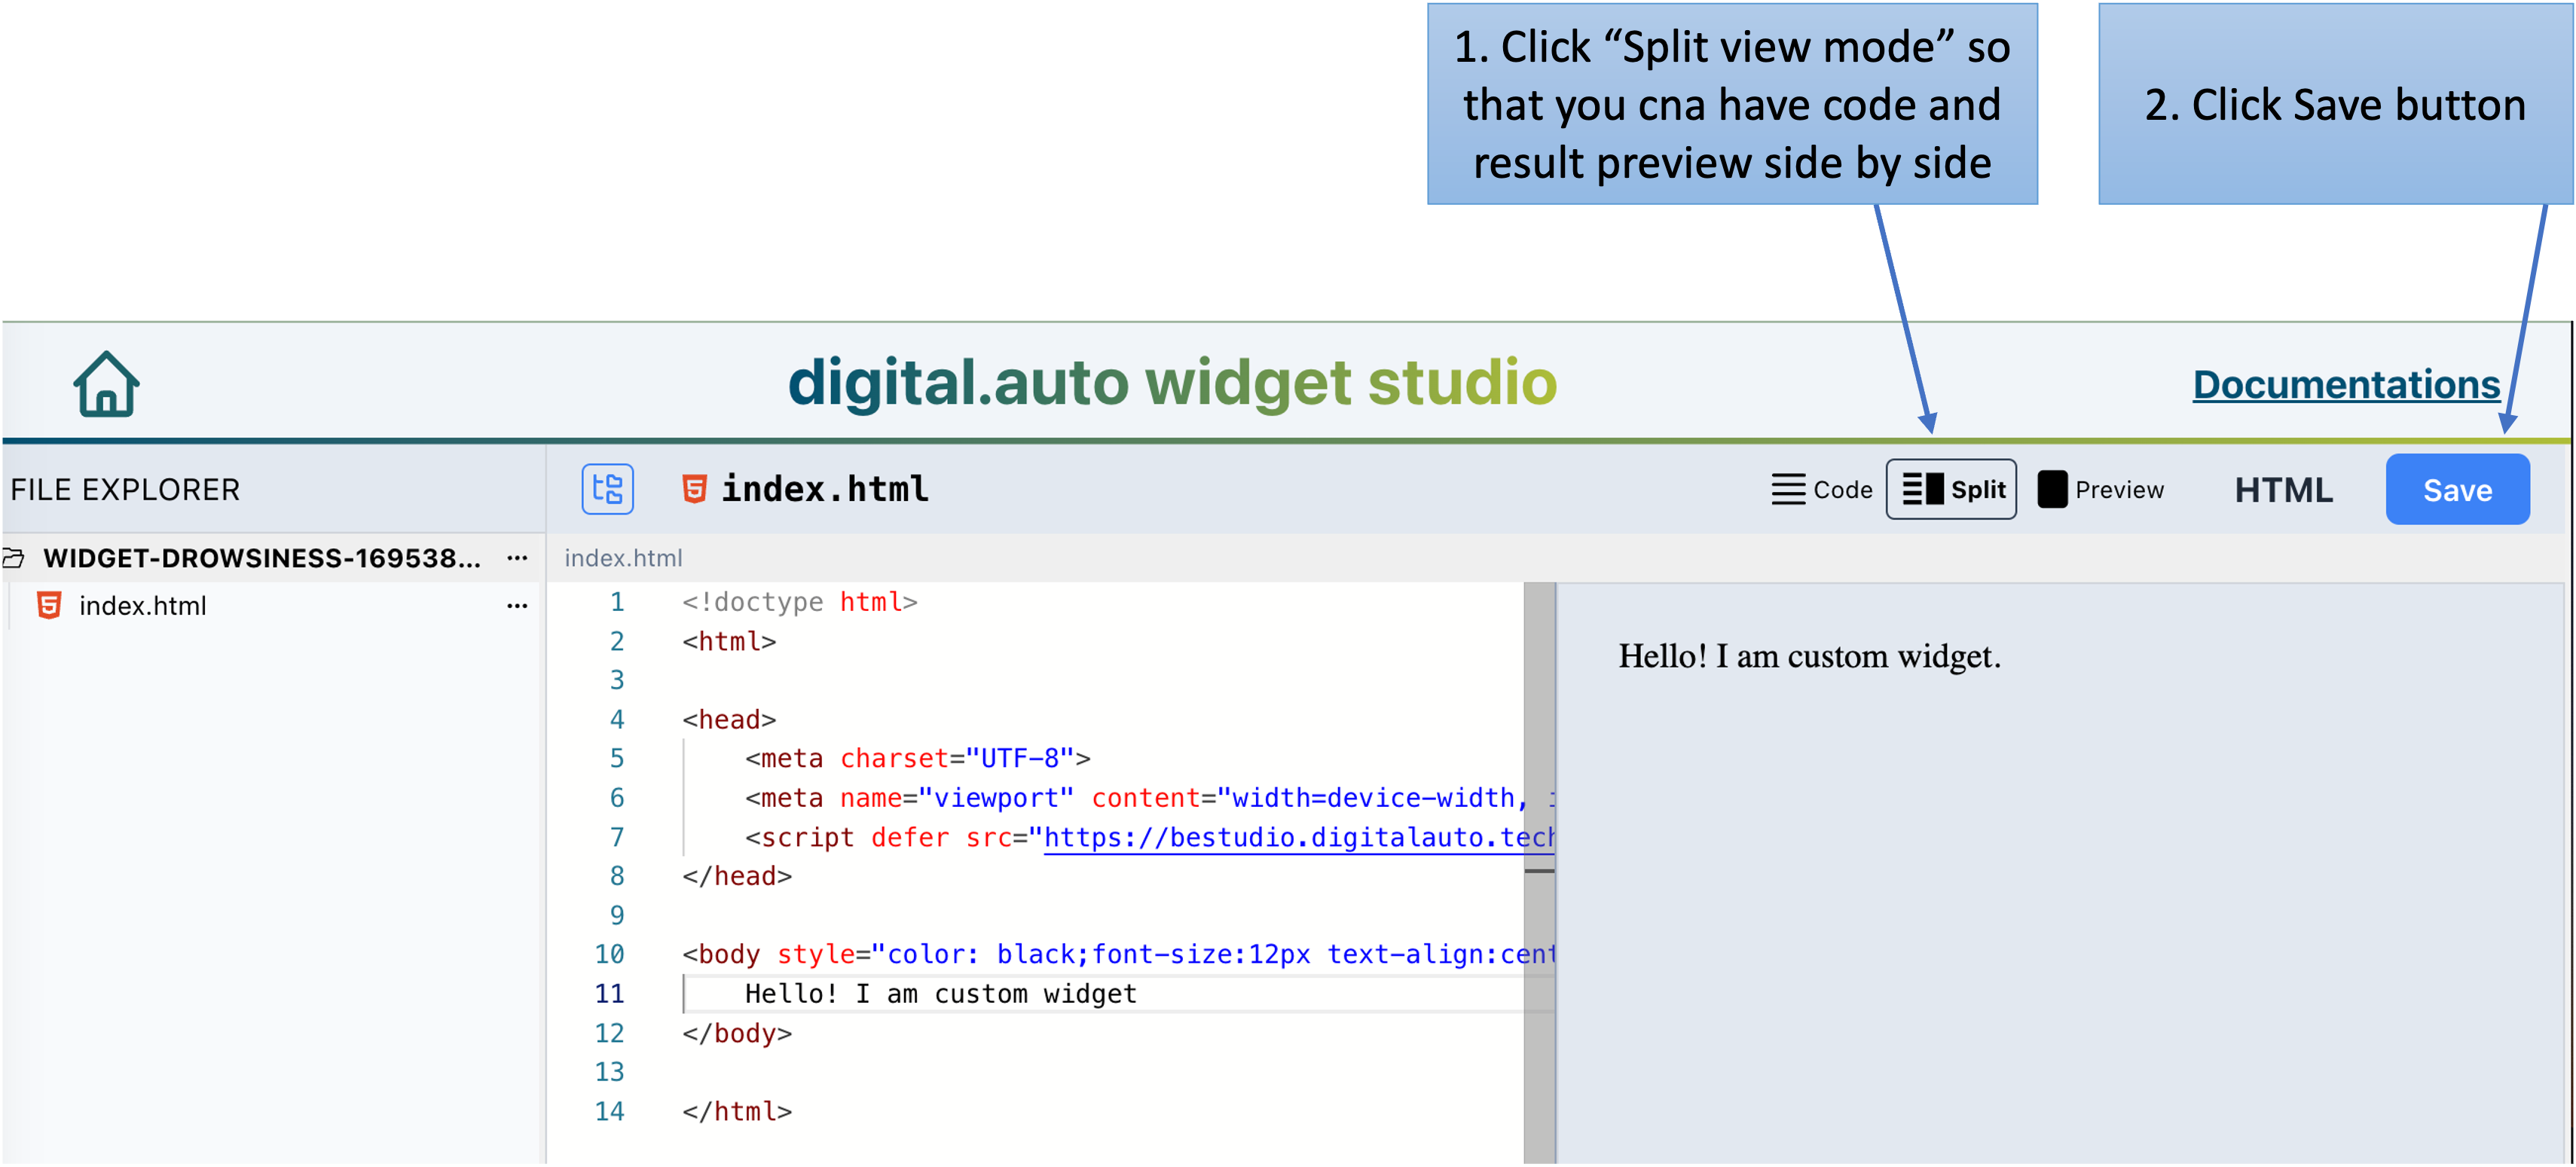
Step 4: Change to split view mode, and click save to force the preview rerender. Then you view see the result on the right side
Step 5: Go back the Prototype Chrome tab, click on Dashboard to check the result.
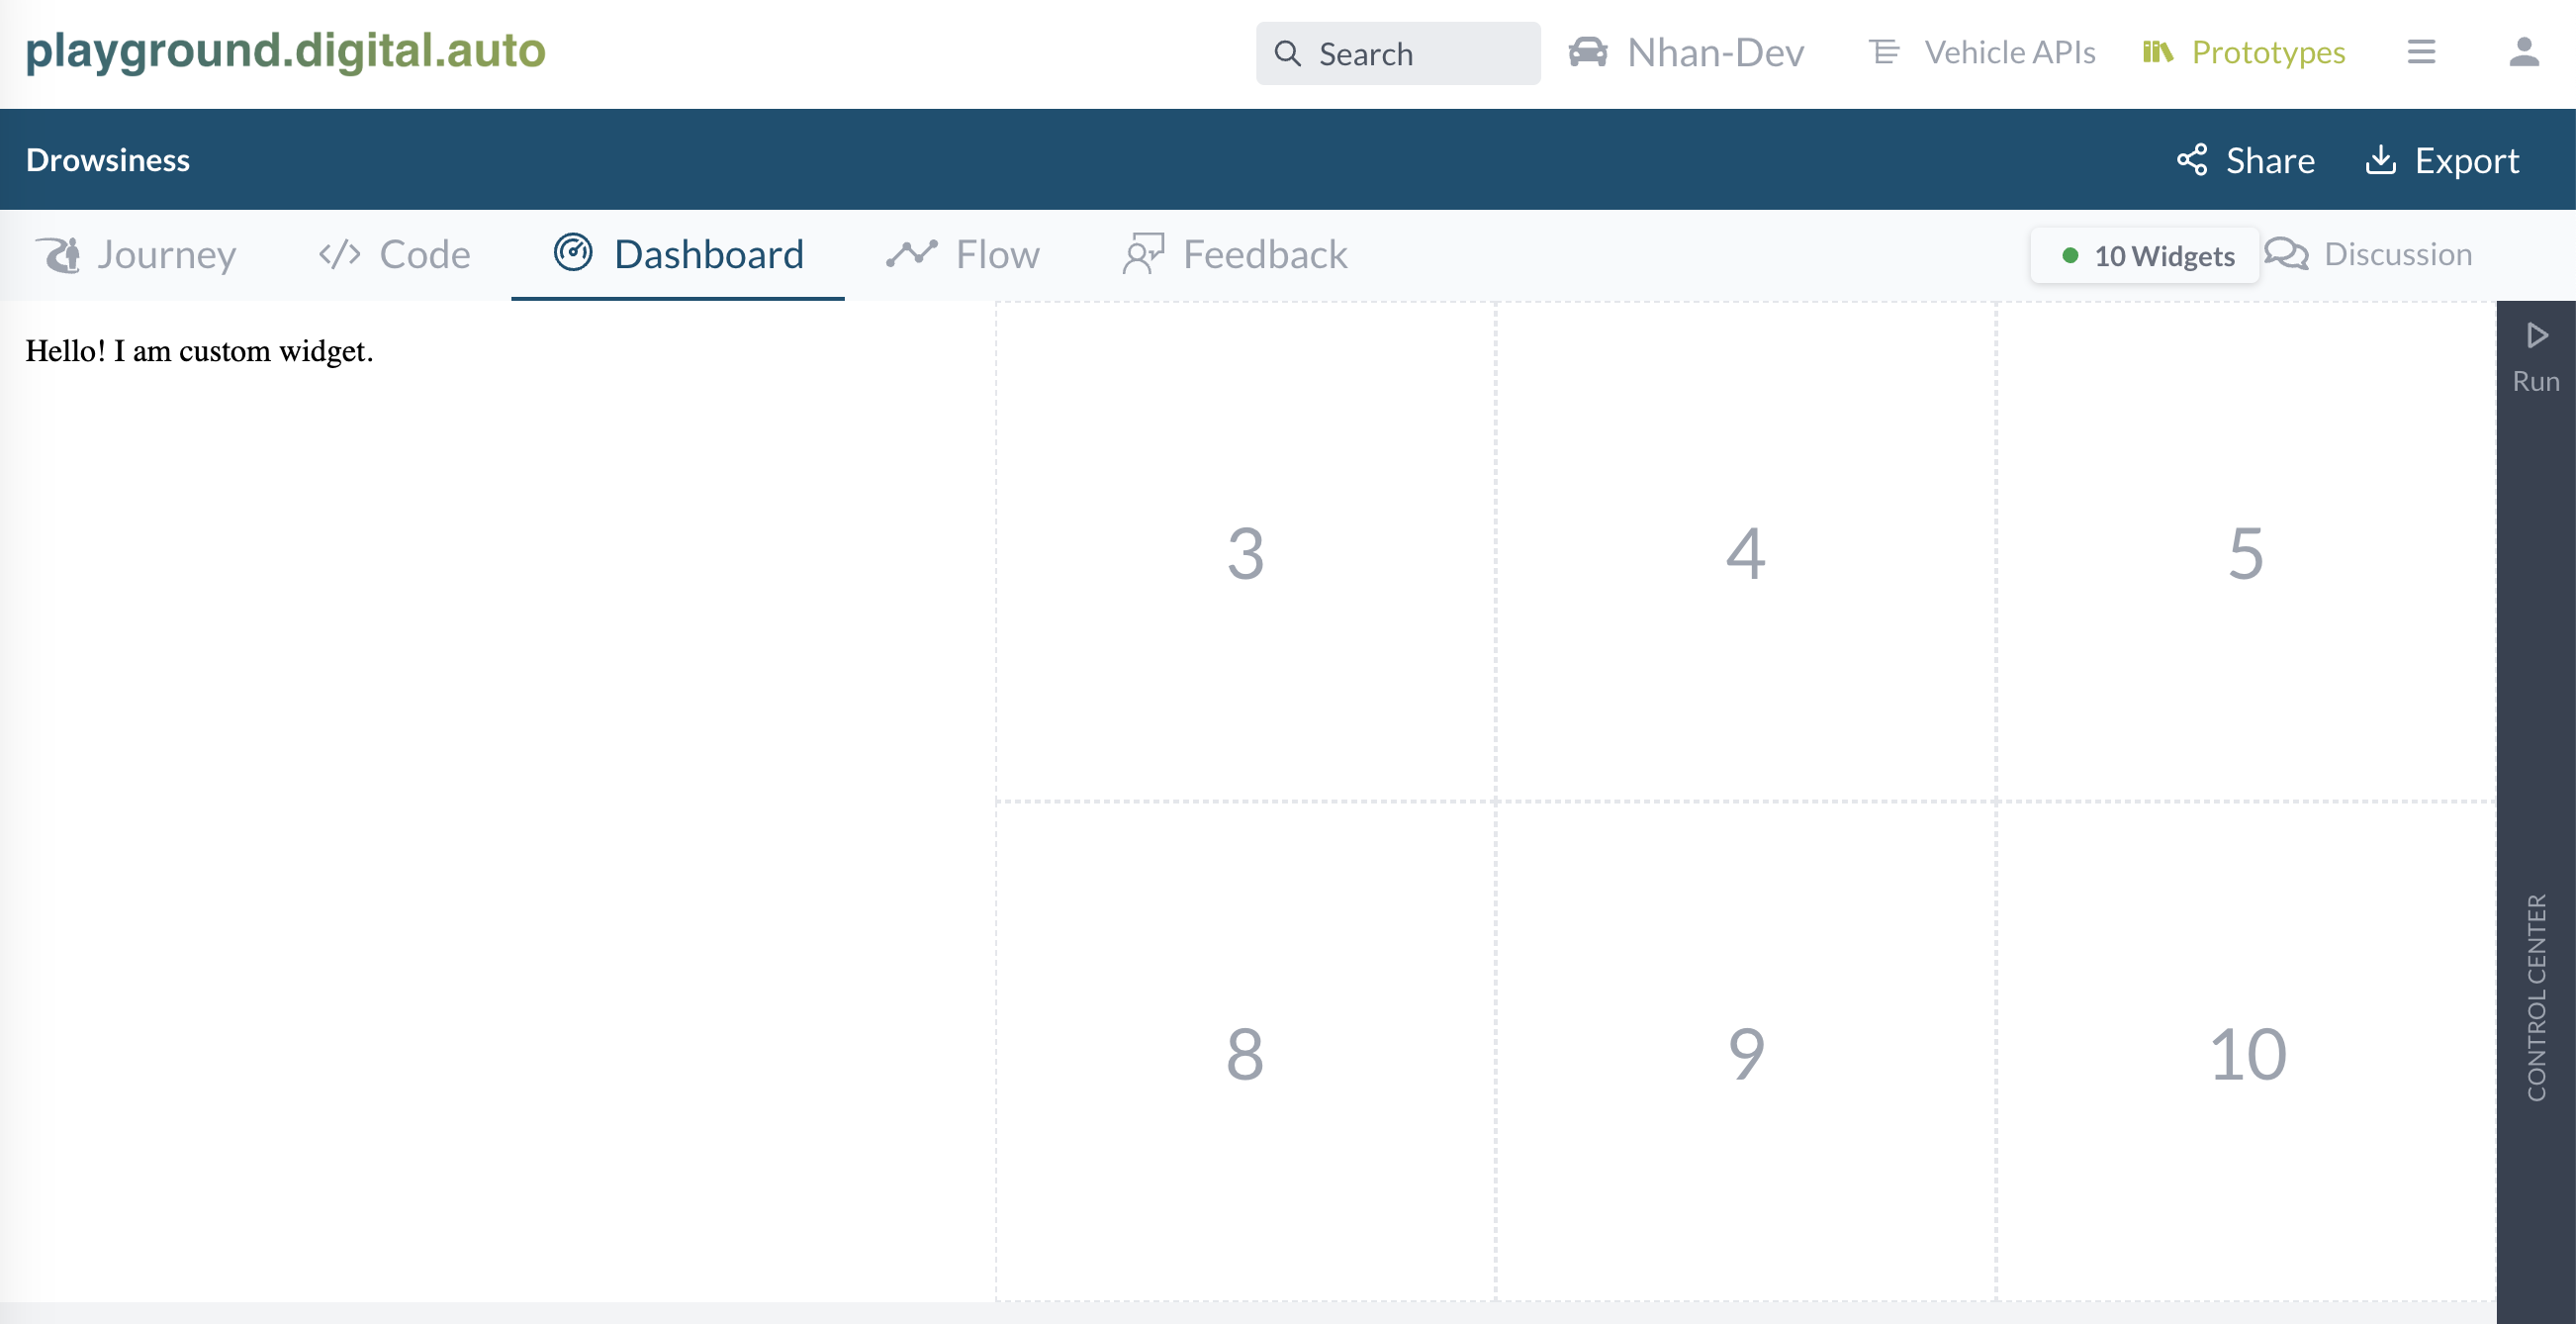
From now on, you can edit html the code on studio => Save => double check the result with the preview panel on the right side. » Finally when you happy with the look and feel. Go back to playground, reload the page to check it in playground.
3. Access API value from widget
Up to this step, we know what is a widget, and able to create a widget for the playground. Now we shall make an association between widget an a vehicle API.
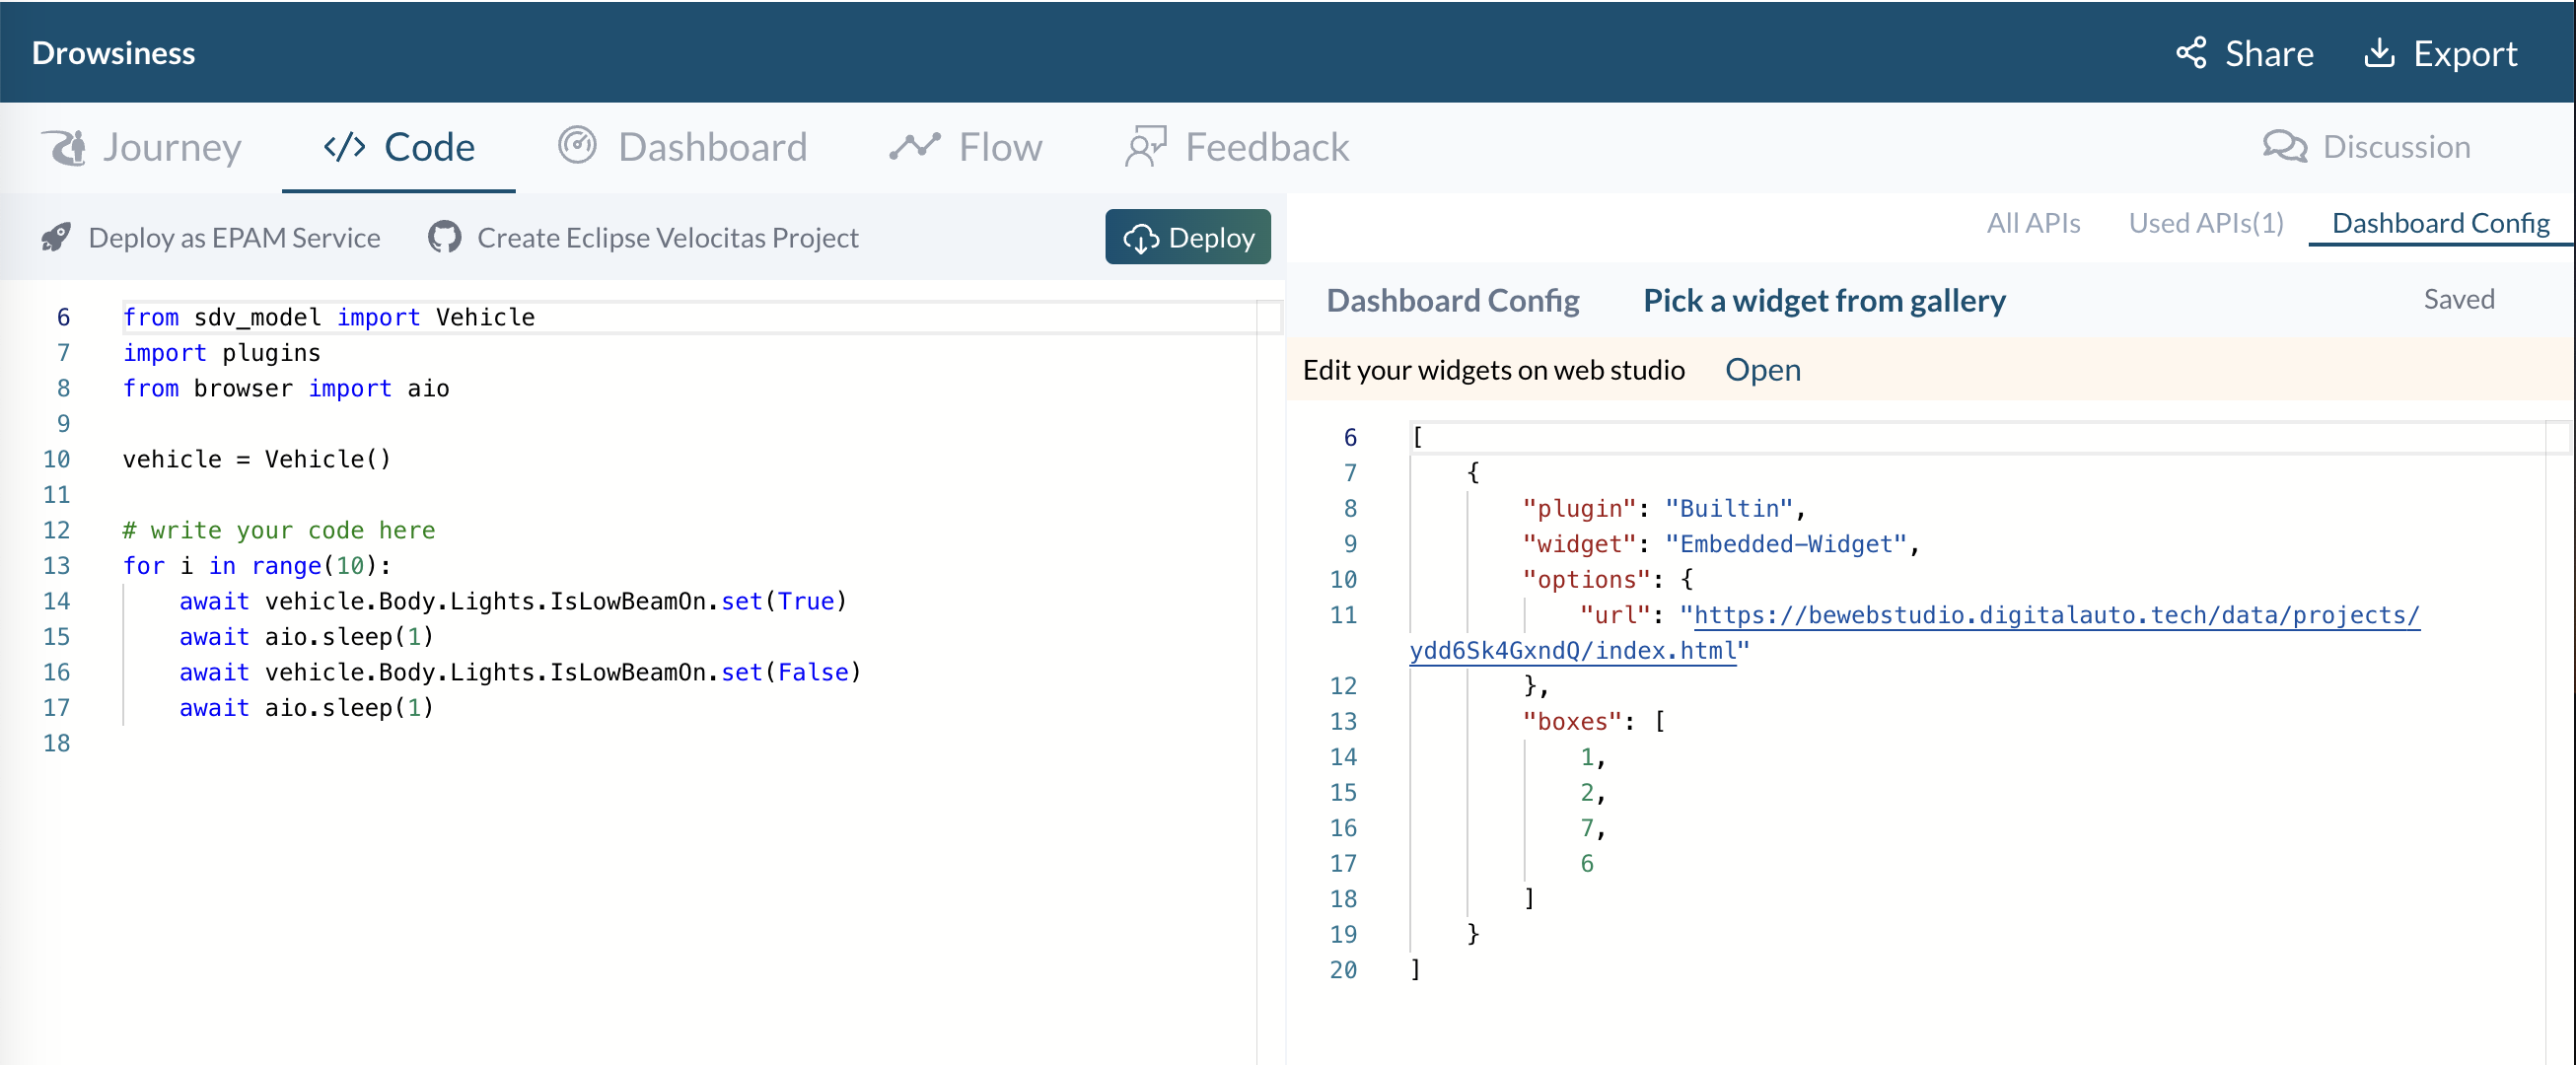
Let’s create a simple prototype that use a vehicle API. In playground Code tab, append bellow code to blink the headlight every second during a period of 10 seconds.
from sdv_model import Vehicle
import plugins
from browser import aio

vehicle = Vehicle()

# write your code here
for i in range(10):
    await vehicle.Body.Lights.IsLowBeamOn.set(True)
    await aio.sleep(1)
    await vehicle.Body.Lights.IsLowBeamOn.set(False)
    await aio.sleep(1)
Now let’s display the state of the headlight on our newly created widget. This is the most crucial step to enable the association between widget and Vehicle API.
In body of widget code, replace ‘Hello! I am custom widget.’ with this code. Remember saving the code before moving on.
<body style="color: black;font-size:12px text-align:center;padding: 8px;">
    <div vss="true"
        vss-name='Vehicle.Body.Lights.IsLowBeamOn'>
    </div>
</body>
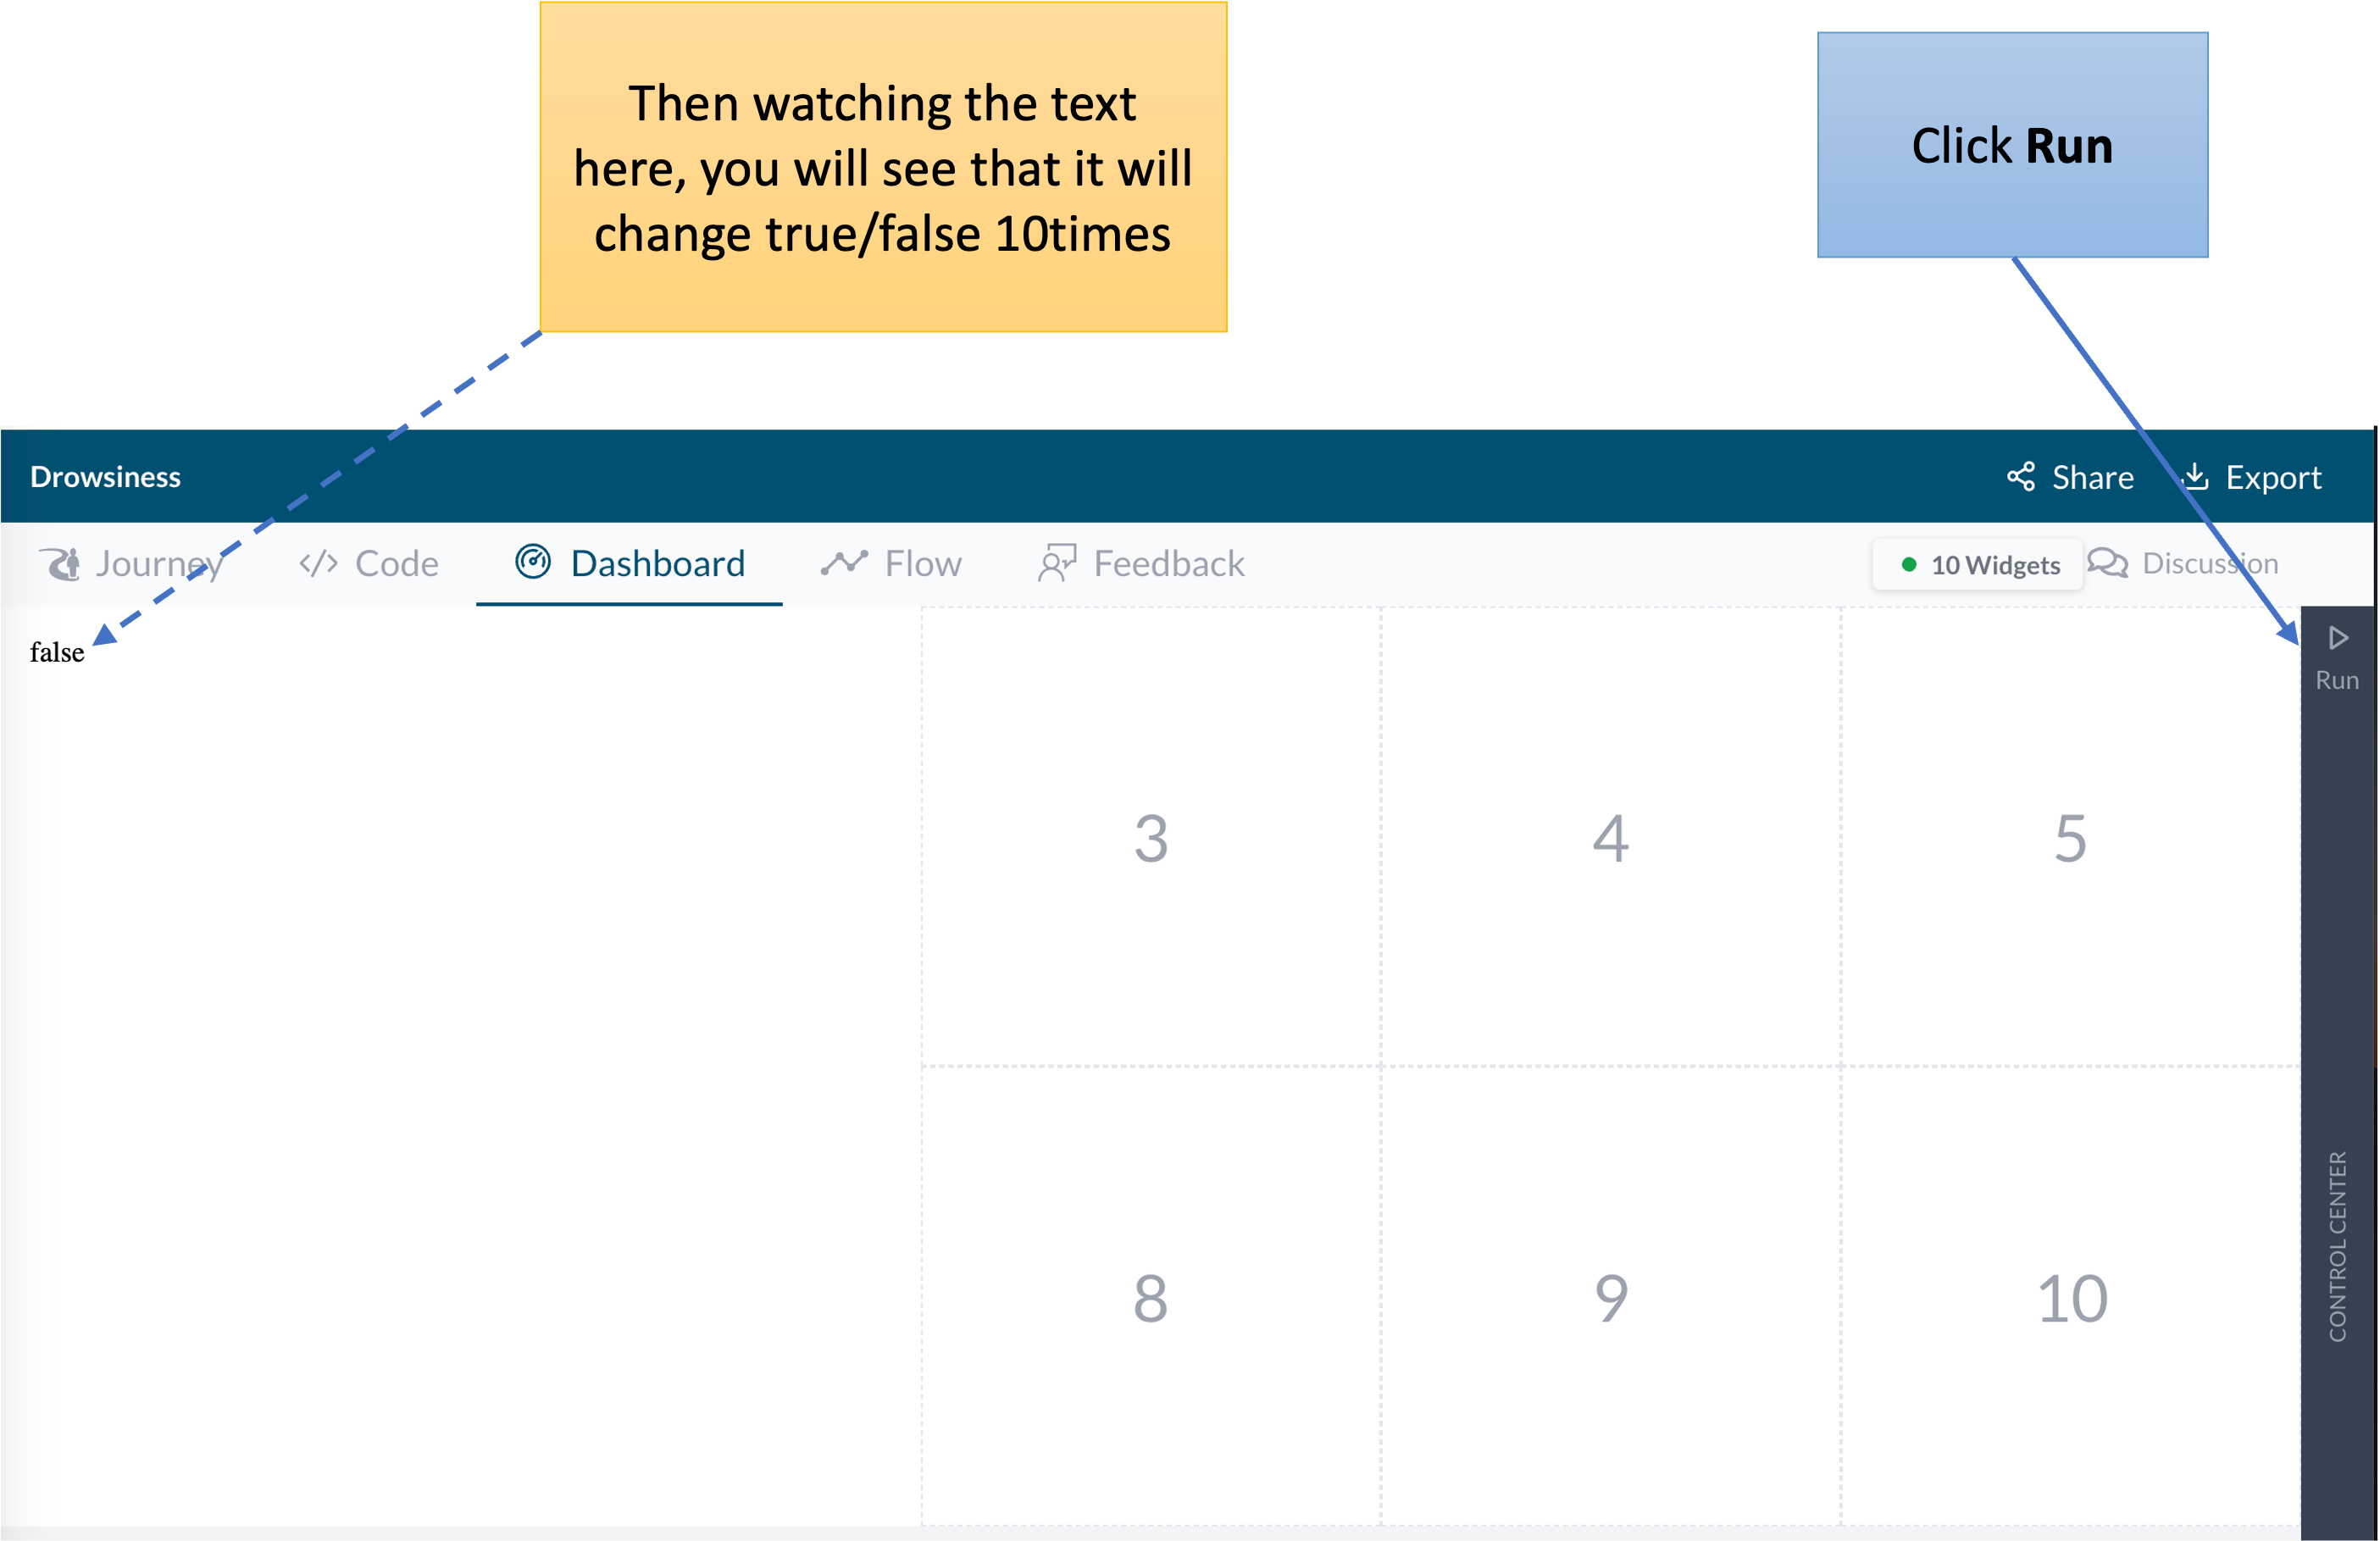
Next, see the result. Open the Dashboard tab, reload it, and click Run button. The outcome should look like this.
Now, it’s free for you to add / adjust the style to match with the desired looks and feel. Here is a sample code to make the text bigger, with teal color.
<body style="color: black;font-size:12px text-align:center;padding: 8px;">
    <div style="font-size:24px;color:gray;text-align:center;">Headlight Low Beam Status</div>
    <div vss="true"
        vss-name='Vehicle.Body.Lights.IsLowBeamOn'
        style="font-size:50px;color:teal;text-align:center;font-weight:700;">
        0
    </div>
</body>
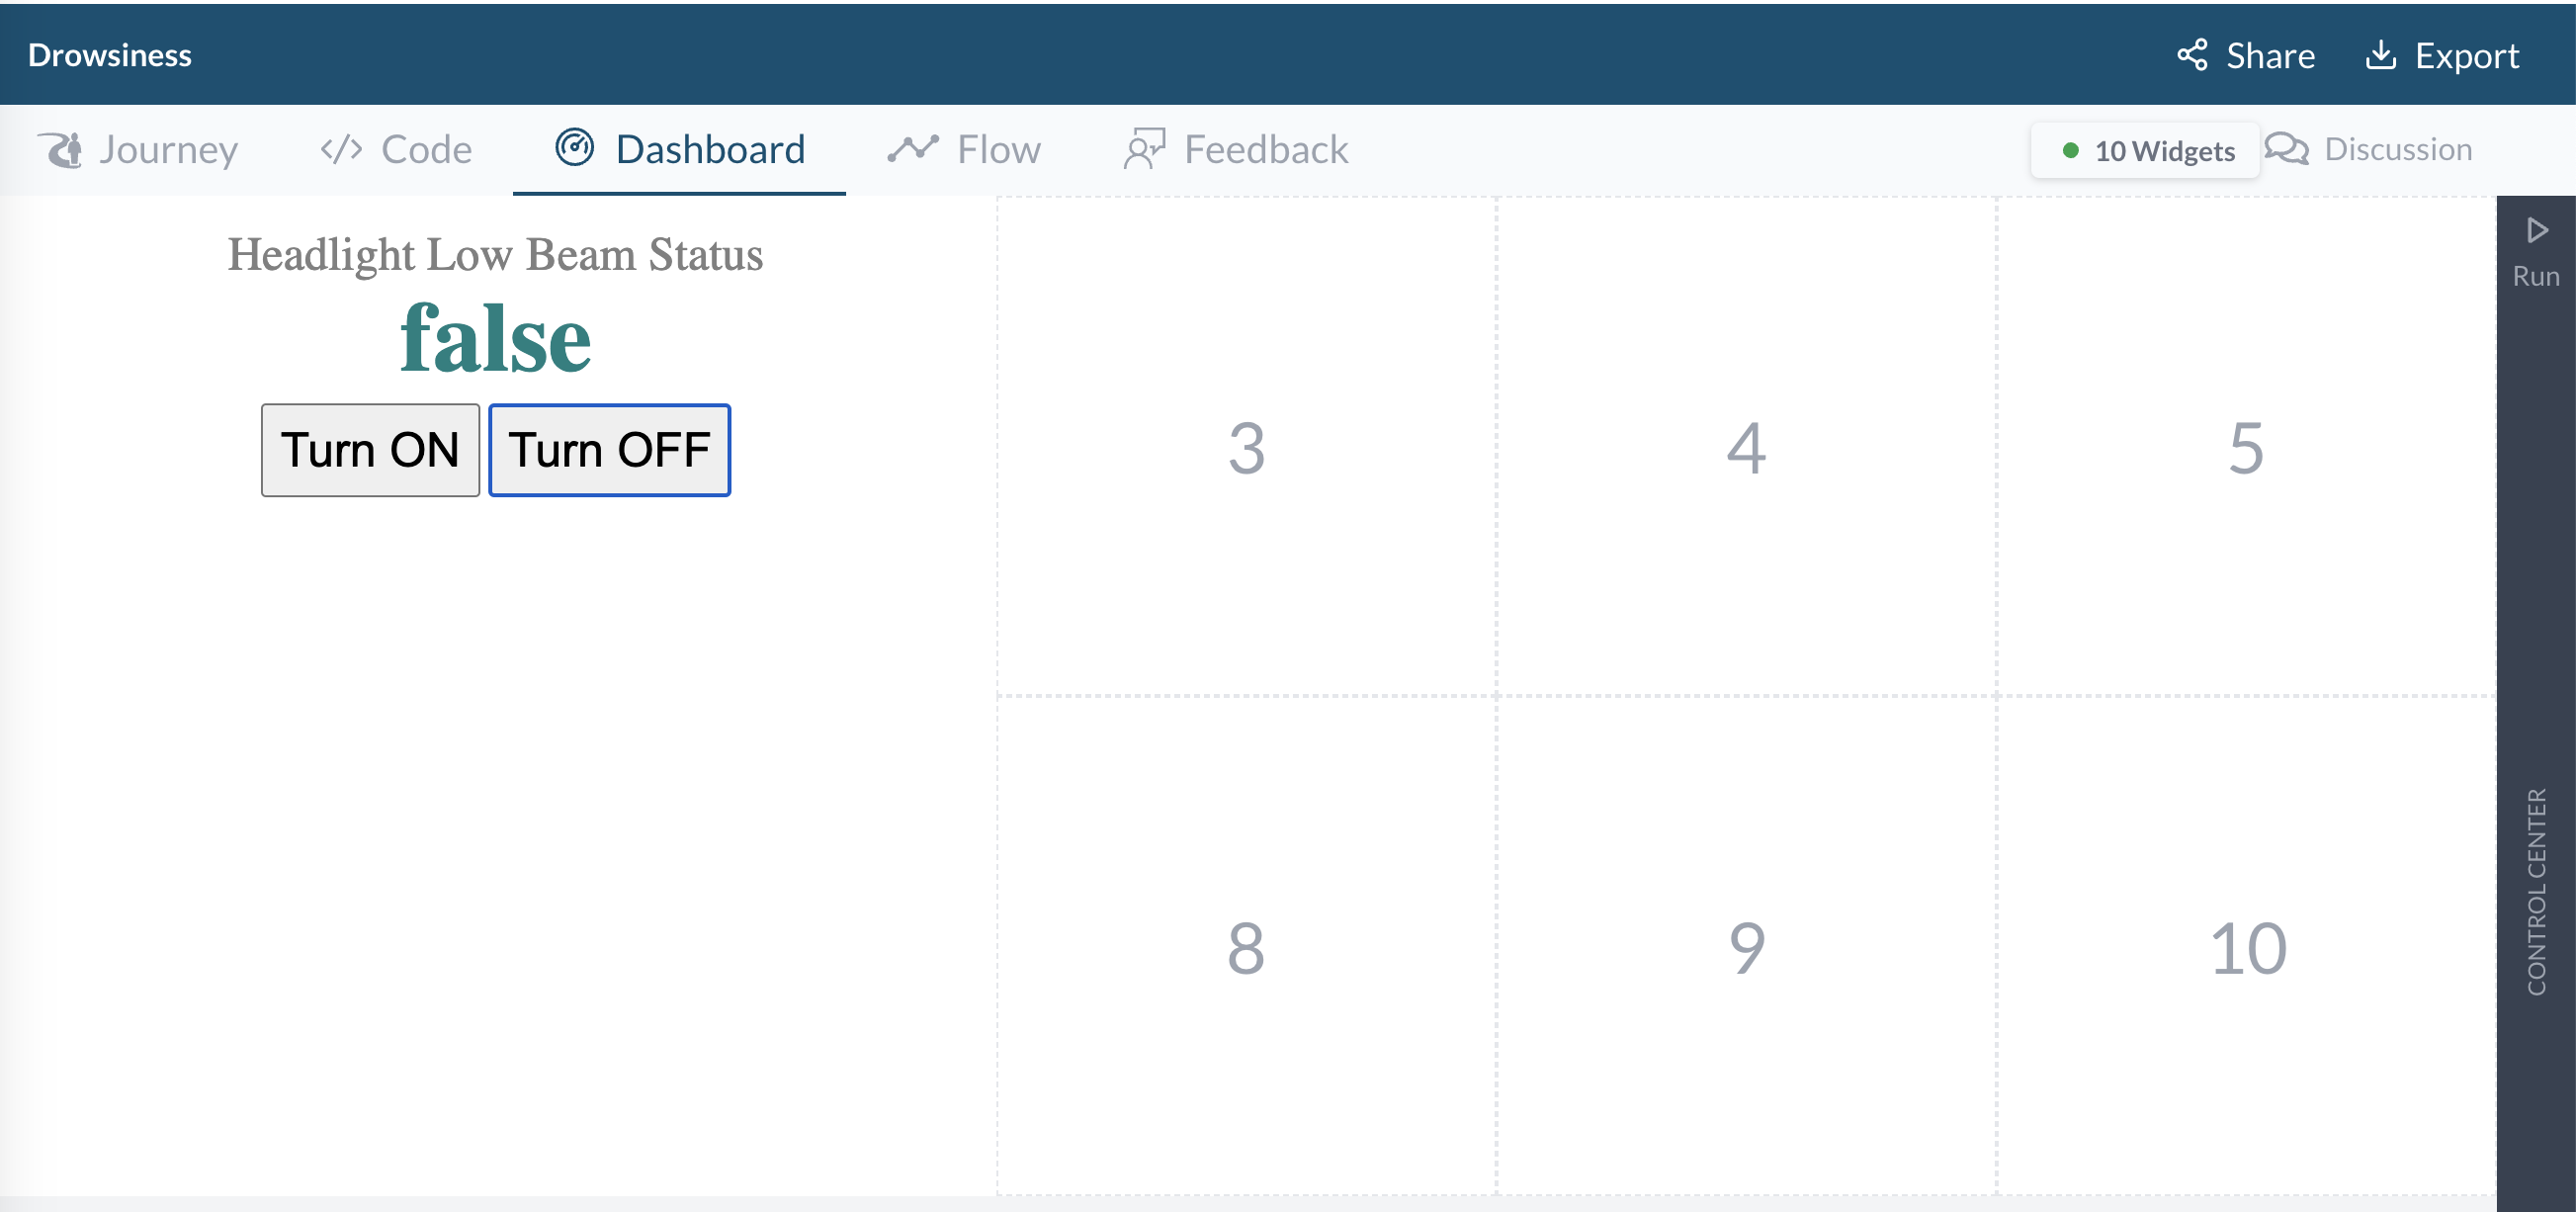
And here is the result:

Next, add two buttons to turn the headlight On and Off:
<body style="color: black;font-size:12px text-align:center;padding: 8px;">
    <div style="font-size:24px;color:gray;text-align:center;">Headlight Low Beam Status</div>
    <div vss="true"
        vss-name='Vehicle.Body.Lights.IsLowBeamOn'
        style="font-size:50px;color:teal;text-align:center;font-weight:700;">
        0
    </div>
    <div style='text-align:center;margin-top:4px;'>
    <button vss="true"
        vss-name='Vehicle.Body.Lights.IsLowBeamOn'
        action='set::true'
        style='padding: 8px;font-size:24px;'>
        Turn ON
    </button>
    <button vss="true"
        vss-name='Vehicle.Body.Lights.IsLowBeamOn'
        action='set::false'
        style='padding: 8px;font-size:24px;'>
        Turn OFF
    </button>
    </div>
</body>
Now back to Dashboard Chrome tab, reload it. And have click the buttons to see the the button working correct or not.
4. Enhance widget with Javascript
Up to now, we only use markdown language to get/set API value. It will simple make code simple and easy to understand. On this section, we will using javascript to manipulate deeper.
If you already satisfy with the look and feel of the widget, you can skip this part, and moving on the Secion 5: Re-use the widget
Change the code as below:
<!doctype html>
<html>

<head>
    <meta charset="UTF-8">
    <meta name="viewport" content="width=device-width, initial-scale=1.0">
    <script>
        let API_NAME = "Vehicle.Body.Lights.IsLowBeamOn"
        let interval = null
        let textValue = document.getElementById("label_value")
        function onWidgetLoaded(options) {
            console.log("On my widget loaded")
            interval = setInterval(() => {
                if(textValue) {
                    let apiValue = getApiValue(API_NAME)
                    console.log("type of apiValue", typeof apiValue)
                    textValue.innerText = apiValue
                }
            }, 500)
        }
        function onWidgetUnloaded() {
            console.log("On my widget unloaded")
            if(interval) clearInterval(interval)
        }

        let btnSetOn = document.getElementById("btnSetOn")
        let btnSetOff = document.getElementById("btnSetOff")

        btnSetOn.addEventListener("click", () => {
            setApiValue(API_NAME, true)
        })

        btnSetOff.addEventListener("click", () => {
            setApiValue(API_NAME, false)
        })
    </script>
    <script defer src="https://bestudio.digitalauto.tech/project/BzR91b49OHqj/syncer.js"></script>

</head>

<body style="color: black;font-size:12px text-align:center;padding: 8px;">
    <div style="font-size:24px;color:gray;text-align:center;">Headlight Low Beam Status</div>
    <div id='label_value'
        style="font-size:50px;color:teal;text-align:center;font-weight:700;">
        0
    </div>
    <div style='text-align:center;margin-top:4px;'>
    <button id="btnSetOn"
        style='padding: 8px;font-size:24px;'>
        Turn ON
    </button>
    <button id="btnSetOff"
        style='padding: 8px;font-size:24px;'>
        Turn OFF
    </button>
    </div>
</body>

</html>
You will get the same result but with get/set by javascript function.
Let explain deeper: First, we need attach the library:
<script defer src="https://bestudio.digitalauto.tech/project/BzR91b49OHqj/syncer.js"></script>
The library support bellow functions:
// this function be called when your  widget mounted
function onWidgetLoaded(options) {
    console.log("On my widget loaded")
}
// this function be called when your widget unmounted
function onWidgetUnloaded() {
    console.log("On my widget unloaded")
    if(interval) clearInterval(interval)
}
And you also have two API to get and set API.
let apiValue = getApiValue(API_NAME)
setApiValue(API_NAME, value)
5. Re-use the widget
On digital.auto -> Widget config, you can see an “open” button to launch Web Studio anytime you want to edit it.
The link in widget -> options -> url: you can copy an it and reuse in other prototype or share it to your co-worker.
You can also can right click on index.html file to copy the link. It’s the same link as above.
