Velocitas on dreamKIT
This Guideline shall walk you through the steps to setup the environment in VCU and run vehicle app based on Velocitas framework.
1. Installation
1.1. Install Docker
sudo apt-get update
sudo snap install docker
sudo apt  install docker.io
sudo service docker start
sudo docker run hello-world
Enable user run docker without sudo
sudo groupadd docker
sudo gpasswd -a $USER docker
remember to logout/login again for the change to take effect
1.2. Install dapr
wget -q https://raw.githubusercontent.com/dapr/cli/master/install/install.sh -O - | /bin/bash
dapr init
// Configure mqtt pubsub in dapr
cd ~/.dapr/components/
cp pubsub.yaml pubsub.yaml.bk
replace all the content of pubsub.yaml with the content below,
apiVersion: dapr.io/v1alpha1
kind: Component
metadata:
  name: mqtt-pubsub
  namespace: default
spec:
  type: pubsub.mqtt
  version: v1
  metadata:
  - name: url
    value: "mqtt://localhost:1883"
  - name: qos
    value: 1
  - name: retain
    value: "false"
  - name: cleanSession
    value: "false"
1.3. Create vss.json specs
This is the input for data broker
mkdir -p ~/working/velocitas
cd  ~/working/velocitas
git clone --recurse-submodules https://github.com/COVESA/vehicle_signal_specification.git
sudo apt install python3-pip
pip install anytree deprecation graphql-core
cd ~/working/velocitas/vehicle_signal_specification/vss-tools
python vspec2json.py  -I ../spec -u ../spec/units.yaml ../spec/VehicleSignalSpecification.vspec vss.json
If it runs successfully, we shall see the output as follows,
INFO     Output to json format
INFO     Known extended attributes:
INFO     Added 56 units from ../spec/units.yaml
INFO     Loading vspec from ../spec/VehicleSignalSpecification.vspec...
INFO     Calling exporter...
INFO     Generating JSON output...
INFO     Serializing compact JSON...
INFO     All done.
And the output file shall be created at, ~/working/velocitas/vehicle_signal_specification/vss-tools/vss.json
1.4. Install core Velocitas python libs
// install dependencies
pip install cloudevents
// install velocitas app sdk
pip install git+https://github.com/eclipse-velocitas/vehicle-app-python-sdk.git@v0.9.2
If it runs OK, it should create ~/.local/lib/python3.10/site-packages/sdv
Install vehicle model pip install git+https://github.com/eclipse-velocitas/vehicle-model-python.git@v0.3.0
If it runs OK, it should create ~/.local/lib/python3.10/site-packages/sdv_model
Make a link from sdv_model, this shall be used by vehicle app from digital.auto
ln -s ~/.local/lib/python3.10/site-packages/sdv_model ~/.local/lib/python3.10/site-packages/vehicle
2. Experiment
2.1. Run local runtime environment
Run mqtt server
docker run --rm --init --name mqtt-broker -p 1883:1883 -p 9001:9001 --network host eclipse-mosquitto:2.0.14 mosquitto -c /mosquitto-no-auth.conf &
Run data broker
export HOME_PATH=~
dapr run --app-id vehicledatabroker --app-protocol grpc --resources-path $HOME_PATH/.dapr/components --config $HOME_PATH/.dapr/config.yaml --app-port 55555 -- docker run --rm --init --name vehicledatabroker -e KUKSA_DATA_BROKER_METADATA_FILE=$HOME_PATH/working/velocitas/vehicle_signal_specification/vss-tools/vss.json -e KUKSA_DATA_BROKER_PORT=55555 -e 50001 -e 3500 -v $HOME_PATH/working/velocitas/vehicle_signal_specification/vss-tools/vss.json:$HOME_PATH/working/velocitas/vehicle_signal_specification/vss-tools/vss.json --network host ghcr.io/eclipse/kuksa.val/databroker:0.3.0 &
2.2. Simulate the ECU signal
Setup Virtual CAN bus for testing
sudo ip link add dev vcan0 type vcan
sudo ifconfig vcan0 up
Install/Run CAN Feeder
cd ~/working/velocitas
git clone https://github.com/eclipse/kuksa.val.feeders.git
cd kuksa.val.feeders/dbc2val
pip install -r requirements.txt
./dbcfeeder.py --val2dbc --dbc2val --use-socketcan --canport vcan0
2.3. Run sample testapp
export HOME_PATH=~
cd ~/working/velocitas
// clone sample app
git clone https://github.com/eclipse-velocitas/vehicle-app-python-template.git
cd vehicle-app-python-template/
pip install -r requirements.txt
// start app
dapr run --app-id testapp --app-protocol grpc --resources-path $HOME_PATH/.dapr/components --config $HOME_PATH/.dapr/config.yaml --app-port 50008 python3 app/src/main.py
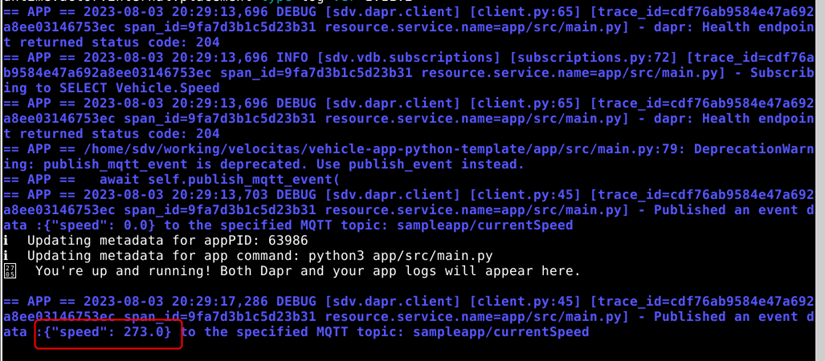
// Now try to send a CAN message to update the vehicle speed
cansend vcan0 257#1111111111111111
We shall see the speed is updated in testapp