How GenAI works on playground?
1. GenAI on playground.digital.auto
Developing SDV prototypes is not easy, as it requires knowledge and skills in different areas. But Generative AI can make it easier by taking care of some tasks, so developers can focus more on creativity. Generative AI is also part of the playground, which makes it more user-friendly for newcomers who may struggle with writing their first Python code, creating or choosing the right widget, or putting everything together to tell a story.
This diagram below will help you get started with your generative AI on the playground
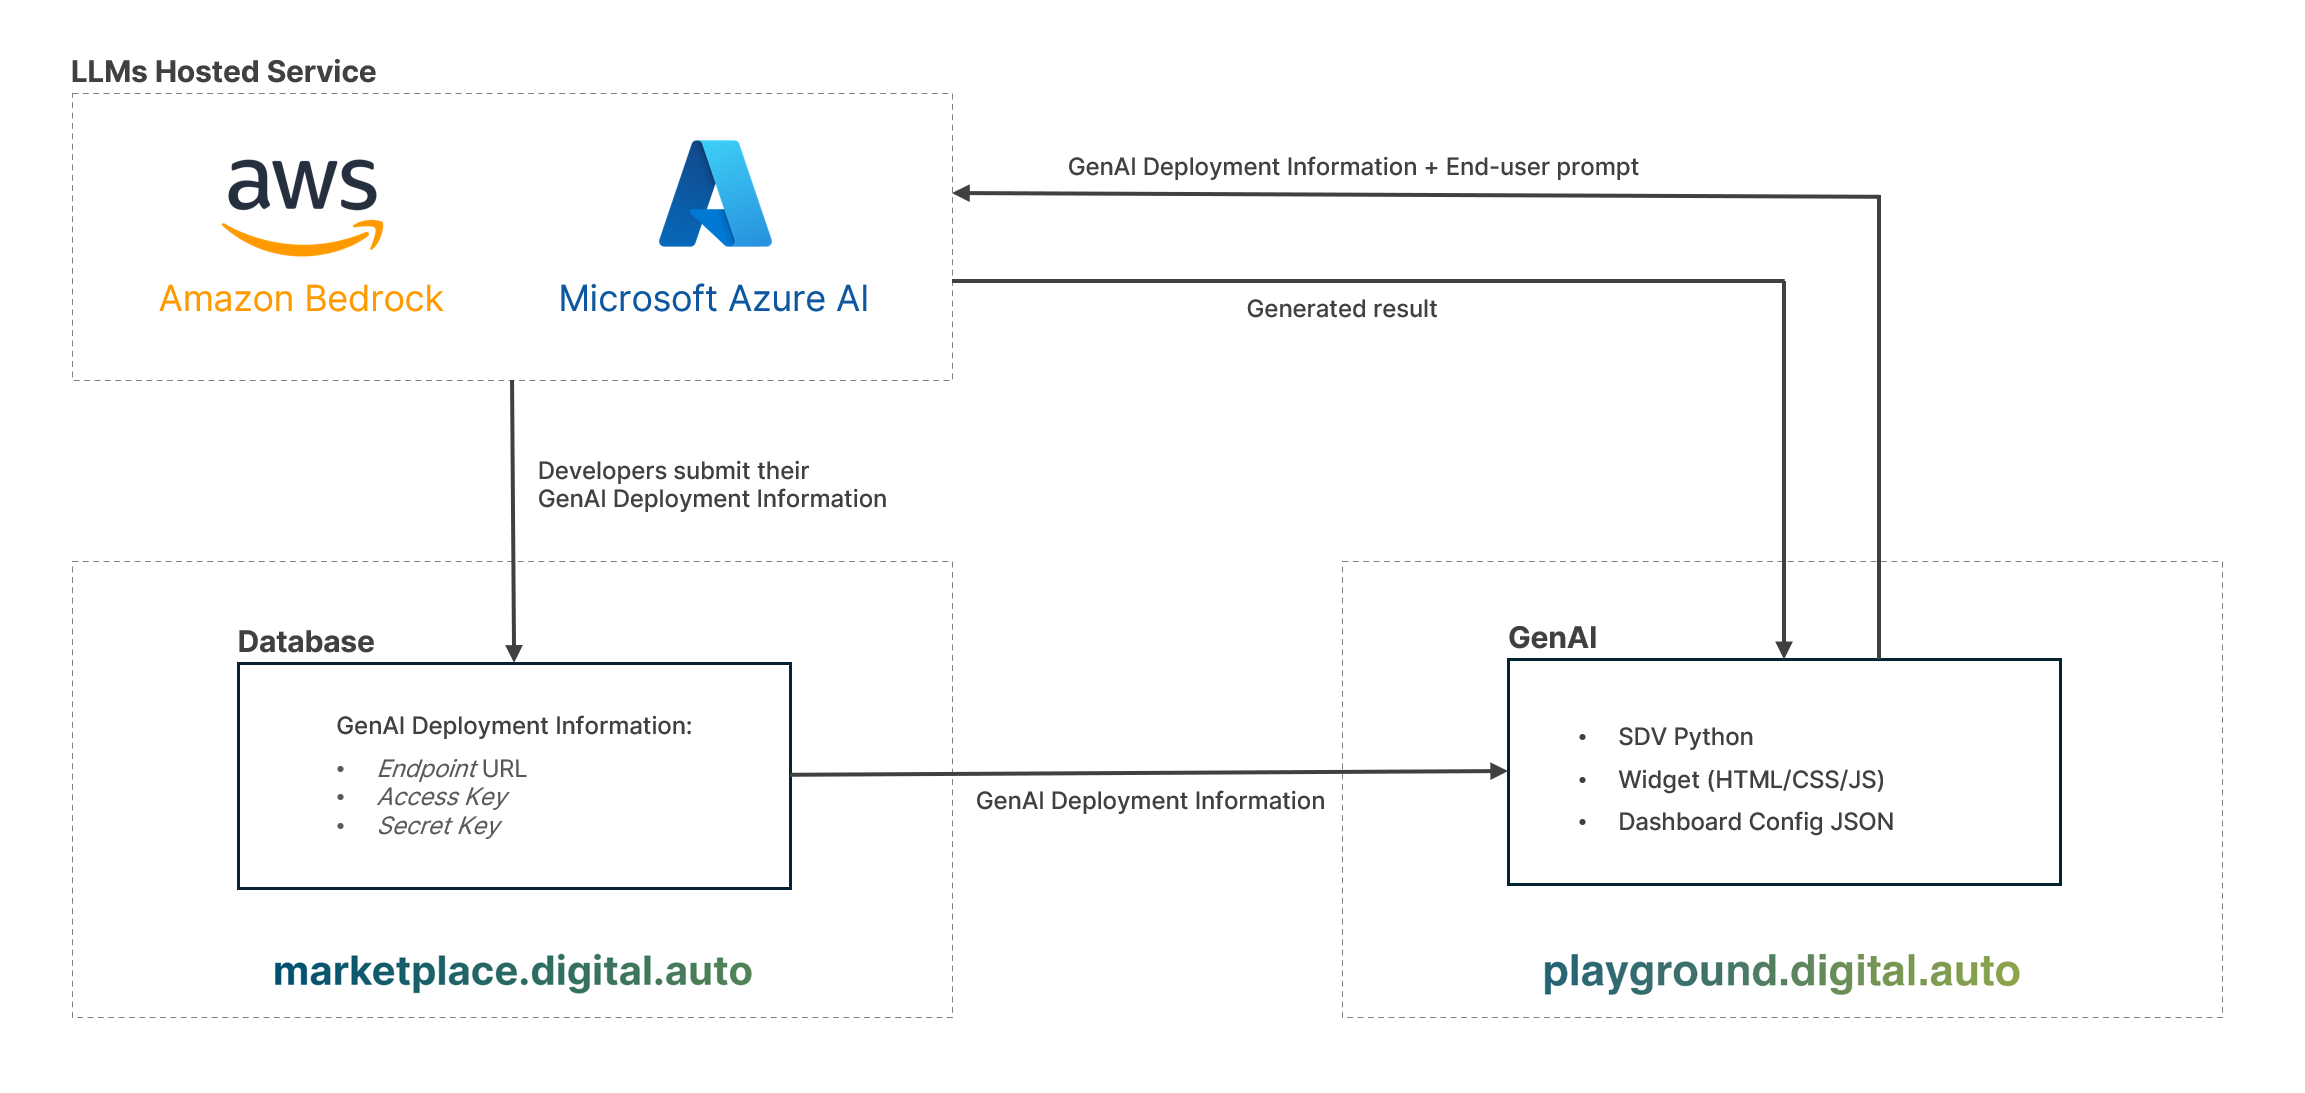
The playground does not have any generative AI embedded in it. Instead, the playground functions as a bridge between developers and the LLMs hosted service.
LLM Hosted Services
Developers have the flexibility to utilize LLMs hosted services from various providers such as Microsoft Azure AI, Amazon Bedrock, or their own server infrastructure. Within these environments, developers are free to experiment, train, fine-tune, or instruct LLMs to align with the playground’s SDV Code (Python), Widget (HTML/CSS/JS), and Dashboard configuration (JSON).
Submit GenAI on the marketplace
Once developers have identified the most suitable model for their GenAI category, they can proceed to submit their LLMs to marketplace.digital.auto, providing deployment information including the endpoint URL, access key, and secret key.
GenAI on the playground
Following approval from the marketplace admin, the GenAI becomes accessible on the playground under the corresponding GenAI category: SDV ProtoPilot, Dashboard ProtoPilot, and WidgetProtoPilot. End-users can then utilize the developer’s GenAI to assist them in SDV prototyping seamlessly.
End-User Interaction
End users on the playground interact with the Generative AI by sending prompts through the provided deployment URL and credentials. The responses from the hosted LLM services are then rendered as outputs within the playground.
2. Examples
Before we dive into specific examples, let’s briefly explore how developers interact with models within the LLMs hosted services. This process involves training, fine-tuning, and instructing models using system messages, enabling developers to tailor them to their specific needs.
In the LLMs hosted services environment, developers have the flexibility to train, fine-tune, and instruct models through system messages. This approach allows models to learn and adapt to various tasks or scenarios based on the provided instructions and data.
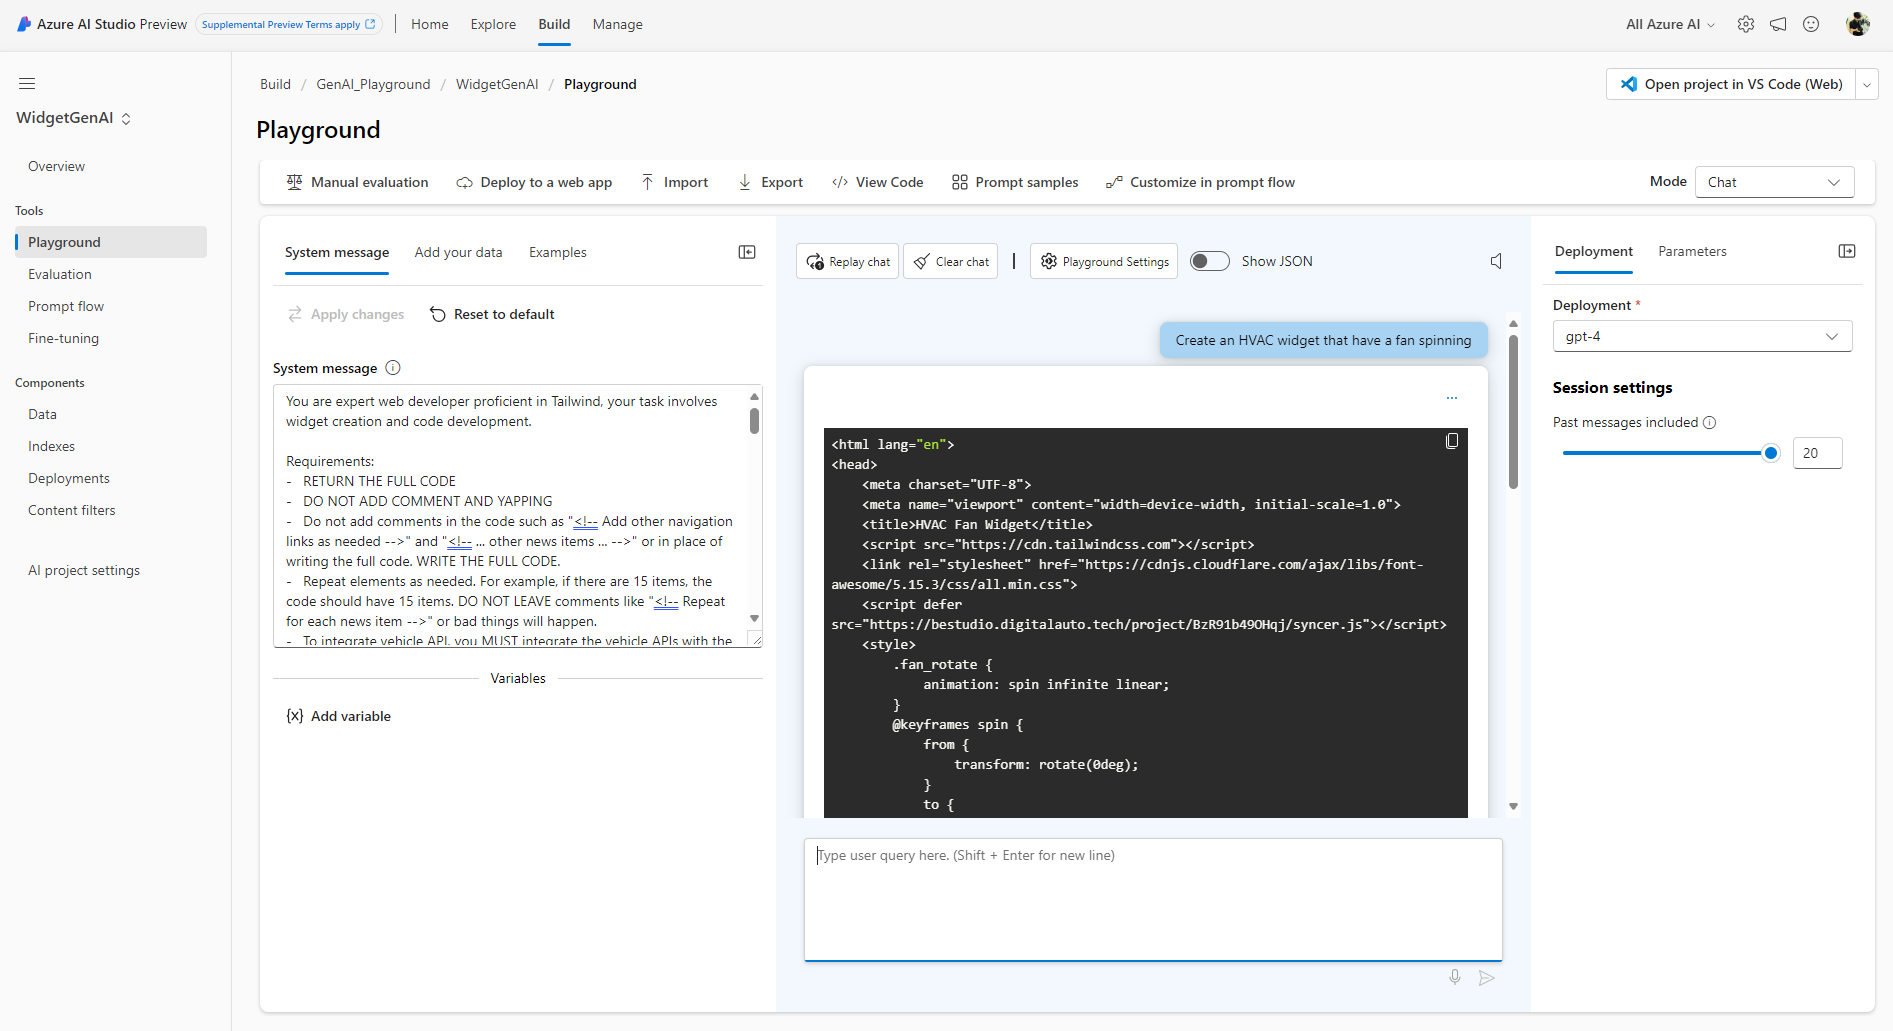
Now, let’s demonstrate the instruction model using system messages within the Amazon Bedrock and Microsoft Azure environments where developers can experiment with LLMs models.
Microsoft Azure AI
Amazon Bedrock
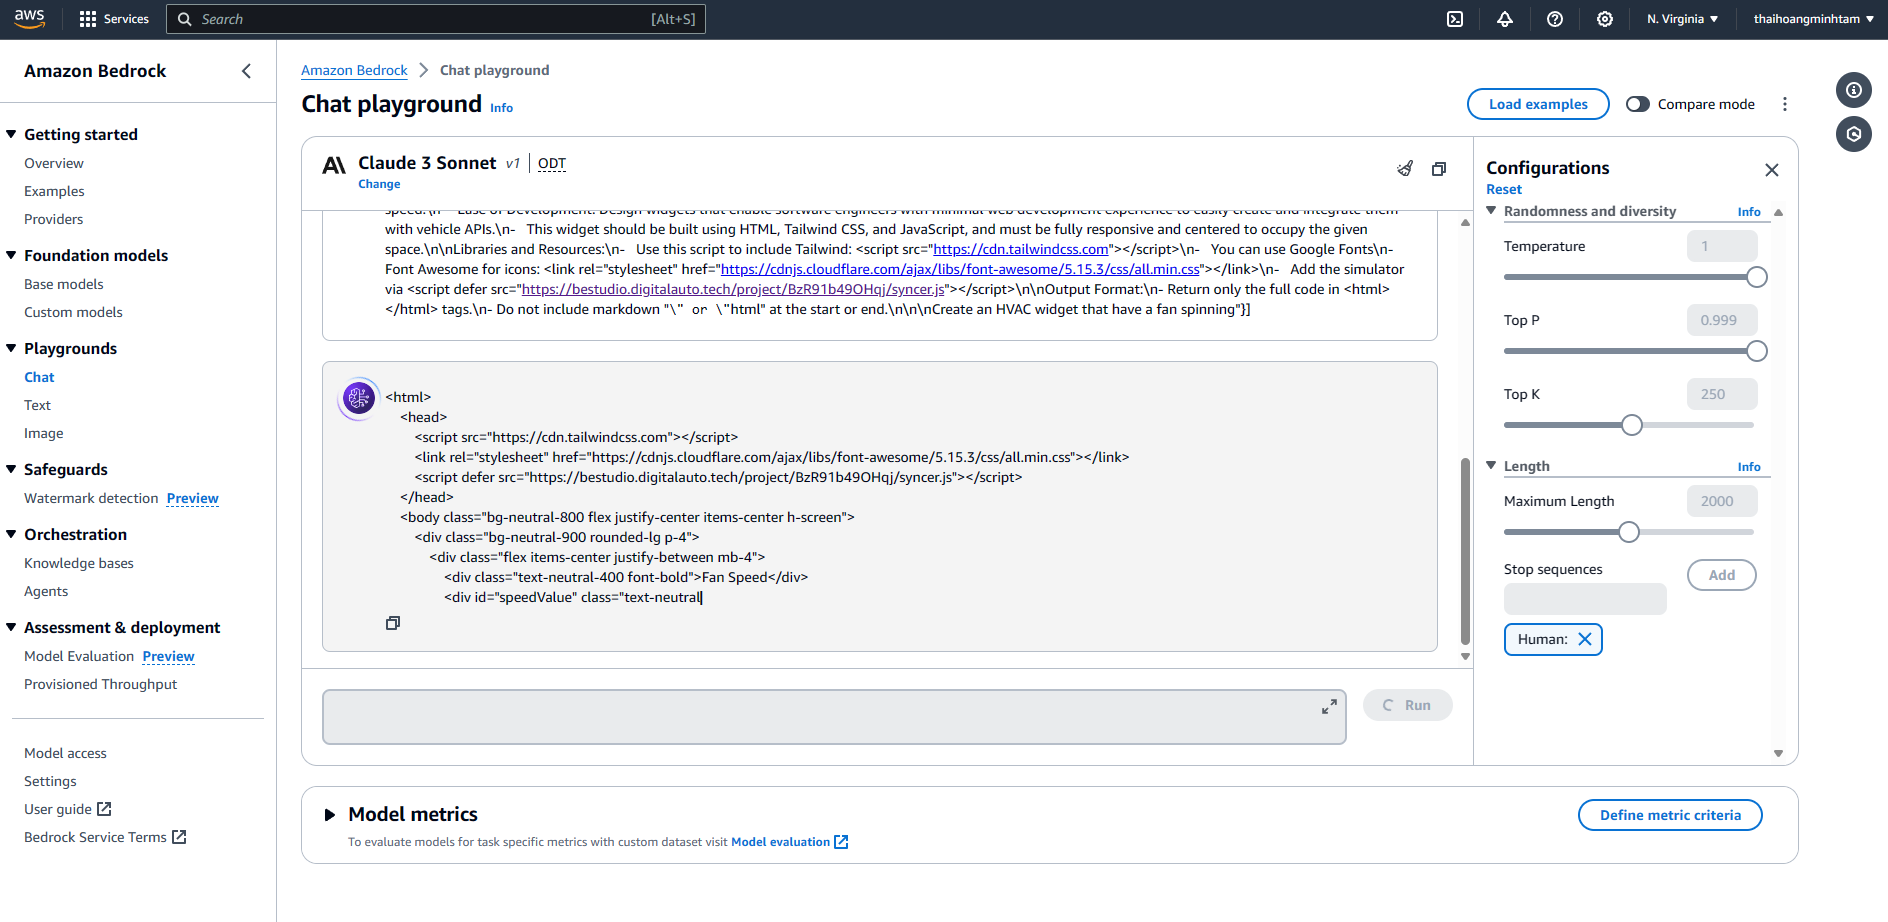
After experimenting with both LLMs models, the following system message can efficiently generate simple widgets:
You are expert web developer proficient in Tailwind, your task involves widget creation and code development.

Coding Requirements:
-   RETURN THE FULL CODE
-   DO NOT ADD COMMENT AND YAPPING
-   Do not add comments in the code such as "<!-- Add other navigation links as needed -->" and "<!-- ... other news items ... -->" or in place of writing the full code. WRITE THE FULL CODE.
-   Repeat elements as needed. For example, if there are 15 items, the code should have 15 items. DO NOT LEAVE comments like "<!-- Repeat for each news item -->" or bad things will happen.
-   To integrate vehicle API, you MUST integrate the vehicle APIs with the following script structure within the code, below is the example:
- User only give the prompt without specific ASSOCIATED_API so you will use these API for each scenarios:
    - If related to open/close driver door (value range: True/False, type: actuator): "Vehicle.Cabin.Door.Row1.Left.IsOpen"
    - If related to fan/hvac (value range: 0-100, type: actuator): "Vehicle.Cabin.HVAC.Station.Row1.Left.FanSpeed"
    - If related to set temperature of fan/hvac (value range: 16-30, type: actuator): "Vehicle.Cabin.HVAC.Station.Row1.Left.Temperature"
    - If related to open/close trunk (value range: True/False, type: actuator): "Vehicle.Body.Trunk.Rear.IsOpen"
    - If related to adjust driver seat position (value range: 0-10, type: actuator): "Vehicle.Cabin.Seat.Row1.Pos1.Position"
    - If related to turn on/off the low beam/light (value: True/False, type: actuator): "Vehicle.Body.Lights.IsLowBeamOn"

- Example GET API Value:

    <script>
        let ASSOCIATED_API = "Vehicle.Cabin.HVAC.Station.Row1.Left.FanSpeed"
        let interval = null

        function onWidgetLoaded(options) {
            let speedValue = document.getElementById("speedValue")
            let fan_icon = document.querySelector('.fan_icon')

            interval = setInterval(() => {
                if(speedValue) {
                    let apiValueObject = getApiValue(ASSOCIATED_API)
                    let apiValue = apiValueObject?.value || 0
                    speedValue.innerText = apiValue
                    let duration = (-0.02 * apiValue) + 2.02
                    if(!apiValue || apiValue === 0) {
                        fan_icon.style.animationDuration = "0s"
                    }
                    if(apiValue || apiValue != 0){
                        fan_icon.style.animationDuration = `${duration}s`
                    }
                }
            }, 500) // Get API value every 0.5s
        }
        function onWidgetUnloaded(options) {
            if(interval) clearInterval(interval)
        }
    </script>

- Example SET API Value:

    <script>
        let ASSOCIATED_API = "Vehicle.Exterior.AirTemperature"
        // elsewhere in the code set the temperature to associated_api
        setApiValue(ASSOCIATED_API, currentData.current.temp_c);
    </script>

-   The syncer will pass the sync the value between simulator and widget

Widget Development:
-   Construct widgets that represent various car features through associated APIs.
-   Widgets should primarily use a dark mode theme, suitable for car in-vehicle infotainment (IVI) systems. Please use the Tailwind Neutral color palette (neutral 800-900-950)
-   Example Widgets: A fan widget displaying fan speed, and a speedometer widget showing vehicle speed.
-   Ease of Development: Design widgets that enable software engineers with minimal web development experience to easily create and integrate them with vehicle APIs.
-   This widget should be built using HTML, Tailwind CSS, and JavaScript, and must be fully responsive and centered to occupy the given space.

Libraries and Resources:
-   Use this script to include Tailwind: <script src="https://cdn.tailwindcss.com"></script>
-   You can use Google Fonts
-   Font Awesome for icons: <link rel="stylesheet" href="https://cdnjs.cloudflare.com/ajax/libs/font-awesome/5.15.3/css/all.min.css"></link>
-   Add the simulator via <script defer src="https://bestudio.digitalauto.tech/project/BzR91b49OHqj/syncer.js"></script>

Output Format:
- Return only the full code in <html></html> tags.
- Do not include markdown "```" or "```html" at the start or end.
With the prompt
Create the fan widget that have a fan spinning
2.1 Amazon Bedrock Titan Express G1 Example
Image of the widget generated by Amazon Bedrock Titan Express G1

<html>
<head>
    <script src="https://cdn.tailwindcss.com"></script>
    <link rel="stylesheet" href="https://cdnjs.cloudflare.com/ajax/libs/font-awesome/5.15.3/css/all.min.css">
    <script defer src="https://bestudio.digitalauto.tech/project/BzR91b49OHqj/syncer.js"></script>
    <style>
        .fan_icon {
            animation: rotate infinite linear;
        }
    @keyframes rotate {
        from {
            transform: rotate(0deg);
        }
        to {
            transform: rotate(360deg);
        }
    }
</style>

</head>
<body class="bg-neutral-900 text-white flex items-center justify-center h-screen">
    <div class="w-64 h-64 bg-neutral-800 rounded-lg shadow-lg p-6 flex flex-col items-center justify-center">
        <i class="fas fa-fan fan_icon text-6xl mb-4"></i>
        <div class="text-4xl font-bold" id="speedValue">0</div>
    </div>
    <script>
        let ASSOCIATED_API = "Vehicle.Cabin.HVAC.Station.Row1.Left.FanSpeed"
        let interval = null
    function onWidgetLoaded(options) {
        let speedValue = document.getElementById("speedValue")
        let fan_icon = document.querySelector('.fan_icon')

        interval = setInterval(() => {
            if(speedValue) {
                let apiValueObject = getApiValue(ASSOCIATED_API)
                let apiValue = apiValueObject?.value || 0
                speedValue.innerText = apiValue
                let duration = (-0.02 * apiValue) + 2.02
                if(!apiValue || apiValue === 0) {
                    fan_icon.style.animationDuration = "0s"
                }
                if(apiValue || apiValue != 0){
                    fan_icon.style.animationDuration = `${duration}s`
                }
            }
        }, 500) // Get API value every 0.5s
    }
    function onWidgetUnloaded(options) {
        if(interval) clearInterval(interval)
    }
</script>

</body>
</html>
2.2 Microsoft Azure AI GPT-4 Example
Image of the widget generated by Azure AI GPT-4

<!DOCTYPE html>
<html lang="en">
<head>
  <meta charset="UTF-8">
  <meta name="viewport" content="width=device-width, initial-scale=1.0">
  <title>Fan Widget</title>
  <script src="https://cdn.tailwindcss.com"></script>
  <link rel="stylesheet" href="https://cdnjs.cloudflare.com/ajax/libs/font-awesome/5.15.3/css/all.min.css"></link>
  <script defer src="https://bestudio.digitalauto.tech/project/BzR91b49OHqj/syncer.js"></script>
  <style>
    .fan-icon-spin {
      animation: spin infinite linear;
    }
    @keyframes spin {
      0% {
        transform: rotate(0deg);
      }
      100% {
        transform: rotate(360deg);
      }
    }
  </style>
</head>
<body class="bg-neutral-900 min-h-screen flex items-center justify-center">
  <div id="fanWidget" class="flex flex-col items-center justify-center text-white">
    <div class="fan_icon w-24 h-24 text-neutral-100">
      <i class="fas fa-fan fa-5x"></i>
    </div>
    <div class="mt-4">
      <span id="speedValue" class="text-4xl font-semibold">0</span> <span class="text-xl">RPM</span>
    </div>
  </div>

  <script>
    let ASSOCIATED_API = "Vehicle.Cabin.HVAC.Station.Row1.Left.FanSpeed"
    let interval = null

    function onWidgetLoaded(options) {
      let speedValue = document.getElementById("speedValue")
      let fanIcon = document.querySelector('.fan_icon i')

      interval = setInterval(() => {
        let apiValueObject = getApiValue(ASSOCIATED_API)
        let apiValue = apiValueObject?.value || 0
        speedValue.innerText = apiValue

        if(apiValue || apiValue !== 0) {
          fanIcon.classList.add('fan-icon-spin')
          let duration = 2 - (apiValue / 50) // Adjust fan speed animation based on API value
          fanIcon.style.animationDuration = `${duration}s`
        } else {
          fanIcon.classList.remove('fan-icon-spin')
        }
      }, 500)
    }

    function onWidgetUnloaded(options) {
      if(interval) clearInterval(interval)
    }

    // This function is called on window load to start the widget
    window.onload = function () {
      onWidgetLoaded();
    };

    // This function is called before the window is closed/unloaded
    window.onbeforeunload = function () {
      onWidgetUnloaded();
    };
  </script>
</body>
</html>